Chocolate attempt number 4
Callebaut’s official tempering guide
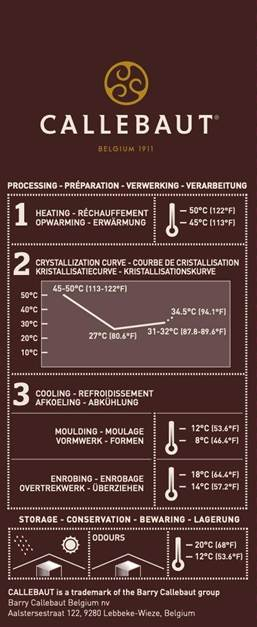
Yep, that’s the one. 🍫
And this is much better because now we have the actual Callebaut chart for your 811 right in this conversation. I’ll use this chart as our source of truth for Attempt #4.
For Callebaut 811 dark chocolate:
| Step | Temperature |
| 1. Melt | 113–122°F (45–50°C) |
| 2. Cool / crystallize | 80.6°F (27°C) |
| 3. Bring back up | 87.8–89.6°F (31–32°C) |
| Upper point shown on curve | 94.1°F (34.5°C) |
| Mold cooling | 46.4–53.6°F (8–12°C) |
🔥 113–122°F → ❄️ 80.6°F → 🍫 87.8–89.6°F
And because we’re molding bonbons, I’d like to aim near 89°F, comfortably inside Callebaut’s specified working range.
Let me uh Let me ask you about mold cooling. I don’t have a place to make that temperature that low
Yeah, totally fair. You don’t need a dedicated cooling cabinet to make this work. How warm is your kitchen right now, roughly?
68 degrees
Oh, that’s actually pretty good. At 68, you can just let the molds rest at room temp. No fridge is needed unless things go sideways. The fridge can risk condensation, which would lead to sticking and sugar bloom. If you had to use it, it would be very briefly.
But at 68, I’d skip the fridge completely. I know that sounds less technical, but sometimes controlled room temp is exactly what’s needed. Does that take a bit of the pressure off?
– On the. list you gave me, you said upper point temperature on the curve was 94 or something. You’re showing that to me and what is that- telling me
One second, double checking that. All right, great question. So the 94.1 degree number is basically a kind of warning line. It’s not a target. It just means if your chocolate creeps up that high while you’re working, you’ll melt out the good crystals and lose temper. So for us, just focus on melting fully at 113 degrees Fahrenheit, cooling down to 80.6,
About Cocoa Butter
Thank you We’ll get to that later Um. What… what i wanna ask now, first of all. is how, you- you- you know the bottles that they come in, the 7 oz bottles How do I get the chocolate out of there and if I have to put it back in, do I put it back in or do I save it into a different container
Hmm. Checking. The good news is, you don’t need to transfer it. You just gently warm the whole bottle until everything is fully melted, and then shake it well. Pour just a small amount you’ll actually use into a little cup or condiment cup. That’s what you dip into. If what’s left in the cup stays clean, you can pour it right back into the original bottle. But if there’s any doubt
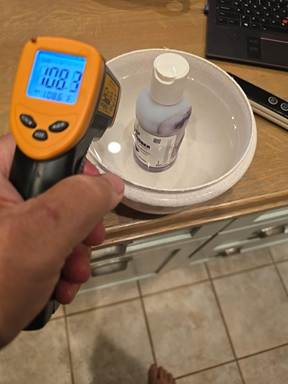
Yes, I can see it. That is the flip-top squeeze bottle I was talking about.
So you don’t need to remove the cap or transfer the whole bottle. Warm the bottle until the cocoa butter is completely melted, shake it very thoroughly, then flip the top open and squeeze a small amount into a little cup for your finger-swiping.
The Chef Rubber site states that the bottles come already tempered, and if you don’t go above a certain temperature it stays that way. Is that true
Checking. Yep, that’s correct and it changes what I’d have you do. These bottles are pre-tempered. As long as you don’t overheat them, you can keep that temper. Just warm gently until liquid. Shake well, and try to work around 86 degrees. Totally simpler.(www.reddit.com, www.walmart.com)
How should I prepare a warm water bath
Fill a bowl or mug with warm tap water, around 105 to 110 degrees Fahrenheit, so think comfortably warm, not hot. Set the closed cocoa butter bottle in it, let it sit a minute or so, then take it out, dry it completely, shake really well and check if it’s fully melted. If not, give it another short soak.
This seems like it could take a really long time.
Yes. At about 100°F, that full 7-ounce bottle could take a while because you’re trying to warm a fairly solid mass through plastic.
Your setup looks good, but I’d make the bath warmer. Bring the water to roughly 110°F, then put the bottle back in. Keep the cap and neck above the water, exactly as you have them, so no water gets inside.
Every few minutes, take the bottle out, dry it completely, shake/knead it, then return it to the bath. That redistributes the melted cocoa butter and speeds things up considerably.
And since we’re specifically trying to preserve the Chef Rubber factory temper, I don’t want to casually push the temperature higher than their recommended limit. We should use their actual specification rather than guessing.
When I get to the right temperature, do I just put it in the mold then?
Yes. Once the colored cocoa butter is fully fluid, thoroughly mixed, and at its proper working temperature, you can decorate the mold.
For the finger-swirl design you’re doing, though, I would not squeeze it directly from the bottle into the mold. Squeeze a small amount into a clean little cup, dip a clean gloved fingertip into it, then make your swipe inside each cavity.
After that, let the cocoa butter crystallize/set before you pour in the tempered 811. We can handle that timing when you get there. 🍫🎨
So to reiterate, I need to take it up to110, Put it in my little cup, and then wait for it to go back down to86
Checking. One moment. Okay. Since your Chef Rubber bottles arrive pre-tempered, I would not automatically take them to a 110. Instead, warm gently just until it’s fully
liquid , ideally around 86 degrees Fahrenheit. Then shake really well and use it right away. But if it accidentally goes much hotter than that, then you’d retemper it from scratch. So when you warm that bottle and shake it, does it go fully liquid or are there still little lumps inside?(www.reddit.com)
When I get the temperature, you said we were goin- gonna make a test cavity
Exactly. One cavity first. Thin swipe of color, let it set a bit, and see how it behaves. If it sets nicely and doesn’t-
kay What- what are we wha- how do we test that it’s set nicely
Just watch it, give it a minute or two, very lightly touch the edge. It should look matte, not smudgy. If it still smears, give it a little more time. Want to try that once it’s melted?
It is fully liquid, but I poured some out and it’s only like 85 degrees… which- which it would be warmer, but let’s tell me if that’s okay
Checking. That’s right in the usable range. If it’s fluid enough give it a good stir and do one test cavity. Thin swipe. Wait2-5 minutes and check that it loses the wet shine and doesn’t smear when you barely touch it. If that passes, move on to the others. What color are you using first?
By the way, I’m still waiting, but it look it’s, look, I think it’s looking okay
Sounds good. Smooth flow, no streaks. That’s your cue. Go ahead and do that test cavity swipe. Let it set 2 to 5 minutes, and then do the matte check. Tell me what you see.
Definitely think I’m gonna have to. warm up my cocoa butter in the cup because it looks like it’s solidifying
That makes sense. If it’s starting to thicken, just give it a gentle warm-up in short bursts, stirring in between. Keep it just above that 86 to 90 degree mark, fluid but not hot. Give it a water bath works great. Just no direct contact with the heat.
What’s the temperature I’m supposed to keep it at again
Keep it around 86 to 90 degrees Fahrenheit. Fluid, not hot. If it thickens, short warm bath, dry, shake. Back in business.
Small-Batch Mango Ganache
Yield: Approximately 20–25 bonbons, depending on mold size
Ingredients
- 75 g 100% mango purée
- 25 g honey
- 125 g Callebaut 811 dark chocolate, finely chopped
- 18 g unsalted butter, softened
- Small pinch of salt
Method
- Heat the fruit.
Combine the mango purée and honey in a small saucepan. Heat gently until steaming and hot, but don’t boil aggressively. - Melt the chocolate.
Pour the hot mango mixture over the chopped 811. Let it sit undisturbed for 1 minute. - Emulsify.
Stir slowly from the center outward until the ganache becomes smooth, glossy, and completely uniform. - Add the butter.
Once the mixture has cooled slightly, stir in the softened butter and a small pinch of salt until completely incorporated. - Cool before piping.
Allow the ganache to cool to approximately 82°F (28°C). - Fill the shells.
Pipe the ganache into the finished chocolate shells, leaving enough empty space at the top for a clean chocolate cap. - Let crystallize.
Allow the filling to settle and crystallize before capping the bonbons with tempered chocolate.
Temperature for cocoa butter out of the jar is89 degrees
Perfect. That’s right in the zone. Go ahead with that test cavity swipe. Give it two to five minutes and check for that matte look. If it sets dry, you’re good to decorate the rest.
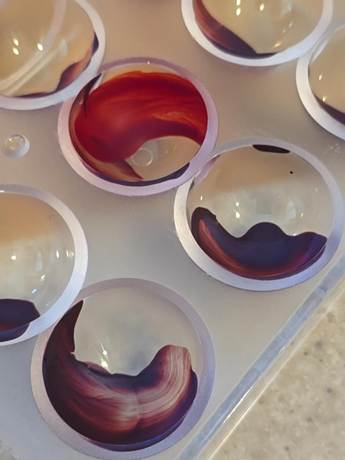
Yes, that looks good. The swipes have nice variation, and I especially like the cavities where you can see those lighter brush/finger streaks through the darker purple. Once the dark 811 goes behind that, the contrast should get much richer.
I wouldn’t try to make every cavity identical. The slight differences are part of what makes this technique look intentional rather than factory-stamped.
If that purple is dry to a very light touch, you’re ready for the red layer. 🍫🎨
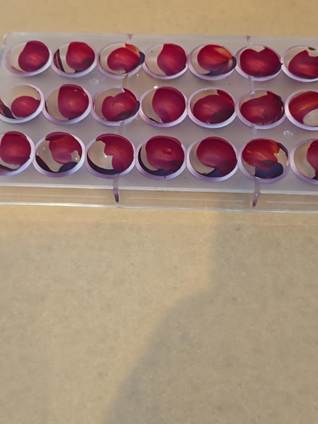
Okay, the red is in and now it’s time to work on the dark chocolate.
Yep. The red is on, and those purple-red overlaps should look really interesting once the dark chocolate backs them. 🍫
Now we switch gears to the Callebaut 811.
Before we touch the chocolate, let the colored cocoa butter sit while we work. That gives it extra crystallization time.
For the 811, we’re following your Callebaut chart:
Melt → 113–122°F
Cool → 80.6°F
Rewarm → 87.8–89.6°F
Since we’re doing this together in real time, only Step 1 for now: start melting the 811. Aim for about 115°F so we’re safely inside Callebaut’s 113–122°F melting range.
Tell me what temperature you’re at as it melts, and we’ll take the next step from there.
When I get to temperature, do I add the seed all at once?
Not quite. Don’t dump all the seed in at once.
Once the melted 811 is around 115°F and completely melted, take it off the heat first.
Then let it cool a little before we begin adding seed. We want the seed to survive long enough to provide stable cocoa-butter crystals, rather than immediately melting away in chocolate that’s still too hot.
So for right now: get the 811 fully melted to about 115°F, remove it from the heat, and tell me when you’re there. Then I’ll tell you exactly when and how much seed to add. 🍫
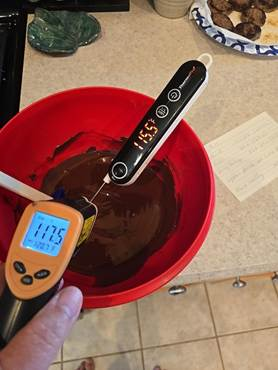
Yep, I can see it. Your probe thermometer is reading about 115.5°F, which is right where we wanted the 811. The infrared reading is lower because it’s measuring the surface, so trust the probe for the chocolate itself.
Take it off the heat now. Stir it gently and continuously for a bit. Don’t add the seed yet.
Tell me when the probe gets down to about 105°F, and we’ll add the seed then. 🍫
Okay, we’re about there.
Good. If the probe is around 105°F, now start adding your 811 seed.
Add a small handful at a time, stirring continuously. Let most of that batch melt before adding another handful. We’re going to use the seed both to introduce the right crystals and bring the temperature down toward 80.6°F.
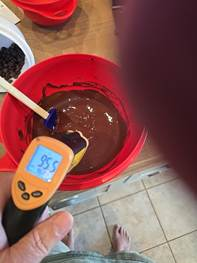
Don’t rush and dump all the seed in. Tell me your temperature after the first couple additions. 🍫
Yep, I see 95.5°F on the infrared thermometer. You’re moving in the right direction.
Keep stirring and add another small amount of 811 seed. Let that melt while you stir. We’re still heading downward toward 80.6°F.
Don’t add a huge amount at once. At 95°F, the seed should start doing more useful work instead of instantly disappearing.
Tell me when you get down around 88–90°F, because that’s where I want us to slow down and watch it carefully. 🍫
Okay, I’m at 90 degrees. There’s still a lot of chips I can see in the chocolate, and I still have quite a bit of save left.
Good. Stop adding seed now. You have enough unmelted 811 in there already.
At 90°F, just keep stirring gently. Those remaining callets will continue melting while also helping cool and crystallize the chocolate.
Our next target from your Callebaut 811 chart is 80.6°F. As you approach it, it’s completely okay if some seed pieces are still present. We can remove any stubborn unmelted pieces before reheating.
So right now: no more seed, just stir and cool. Tell me when you’re around 82°F.
Now feels thicker than it does when you watch it on Videos
Totally normal. Tempering at home often looks thicker than those polished videos. Just keep it moving. Gentle and steady. Don’t add more seed or heat yet. Let’s just let it drift down toward 82, then pause. What’s your temp right now? Even if it’s a quick surface read.
The town to 83.1 seems to be thickening up pretty a lot.
Yeah, at 83.1°F, especially with all those unmelted callets, it can get noticeably thick.
Keep stirring gently and don’t add any more seed. We still want to reach the Callebaut crystallization point at about 80.6°F. Once we get there, we’ll deal with the excess unmelted callets and then rewarm the chocolate to 87.8–89.6°F. That rewarming should loosen it considerably.
So right now, thick is okay. No heat yet. Keep stirring toward 80.6°F.
The temperature is still around 83 or 84 degrees and it’s thickening up a lot.
Stop cooling it. I need to correct our process here. Since we’re using Callebaut’s Callets seeding method, we do not need to force it down to 80.6°F. Callebaut specifically says the seeding method can go directly toward the dark chocolate working temperature, about 87.8–89.6°F. (Callebaut)
The fact that yours is getting very thick at 83–84°F with lots of unmelted seed is telling us we’ve gone too far in that direction.
Next step only: start gently warming it while stirring. We want to bring the chocolate back toward 88–89°F and restore its fluidity. Don’t add any more callets. (Callebaut)
Tell me when you reach about 88°F, and we’ll assess the remaining callets and consistency before putting anything into your mold.
Went a little too far to 93.
93°F is a little above the 811 working range, but you haven’t ruined it.
Take it off the heat now and stir continuously. Don’t add any more seed yet. Let it come back down naturally to about 89°F.
The important part is that 93°F is still well below the temperature where we originally melted the chocolate, so this is recoverable.
When you hit 89°F, tell me two things: whether you still have lots of unmelted callets and whether the chocolate has become more fluid.
Okay, I’m at 89 degrees. It seems more fluid and most of the gillets have melted.
Good. 89°F is exactly where I want you now. And the fact that it’s more fluid and most of the callets have melted is encouraging.
Next step: don’t heat it anymore. Keep stirring gently for about a minute so the temperature is even throughout.
If there are just a few stubborn callets left, remove those rather than trying to melt them with more heat.
Then we’ll do a temper test before that chocolate touches your beautifully purple-and-red mold. 🍫
Okay, am I ready to test it?
Yes. Test it now.
Dip the tip of a clean knife, spoon, or small strip of parchment into the 89°F chocolate so you get a thin coating, then set it down at your 68°F room temperature.
We’re looking for it to begin setting within roughly 3–5 minutes, becoming even, firm, and no longer wet-looking, without obvious streaks.
Do that now, and tell me what it looks like after a few minutes. 🍫
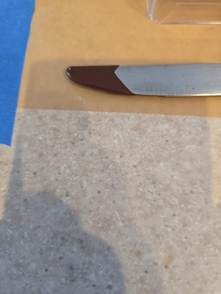
Here it is wet.
Perfect. That’s our time-zero reference. Right now it looks smooth, glossy, and completely wet, exactly what I’d expect.
Don’t touch it or move the knife. Leave it right there at room temperature.
Check it at 3 minutes and send me another picture. We’ll compare it directly to this one. 🍫
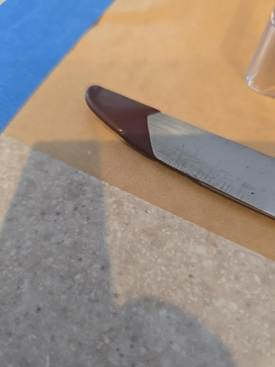
Three minutes are up and it’s dry to the touch.
That’s exactly what we wanted. Three minutes, dry to the touch, and the photo shows it has lost that wet gloss without obvious streaking. Your 811 appears to be in temper. 🍫
Next step only: check the bowl temperature. We want it still in the 87.8–89.6°F working range before we fill your decorated mold.
Tell me the temperature and we’ll go from there.
88.7
88.7°F is perfect. You’re right in the Callebaut 811 working range.
Time to make the shells. 🍫
Next step: pour the tempered chocolate into the decorated mold and fill every cavity completely. Don’t worry about using too much chocolate. We want each cavity full.
Once they’re all full, tell me, and I’ll give you the next move.
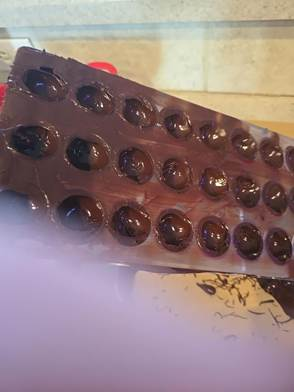
It seems so thick it’s not really coming out of the mold.
Yes, I see it. Stop draining for a moment. The chocolate is definitely behaving too thickly, and I don’t want you fighting the mold and ending up with massive shells.
Hold the mold upside down over your bowl and give the side/back of the mold several firm taps with your scraper or spatula. Let gravity and tapping get as much excess chocolate out as possible.
Don’t scrape the top yet. Tap and drain first.
Tell me whether that gets more chocolate flowing out.
No.
Okay. Put the mold upright now. Don’t keep trying to drain it.
The chocolate has crystallized too heavily and is simply too viscous for thin molded shells. More tapping isn’t going to fix that, and I don’t want to damage the cocoa-butter decoration by messing with it endlessly.
Let’s salvage this batch. Leave the chocolate that’s already coating the cavities in place for now. We’ll let it set and assess how thick the shells actually are.
And importantly, don’t pour any more chocolate into the mold.
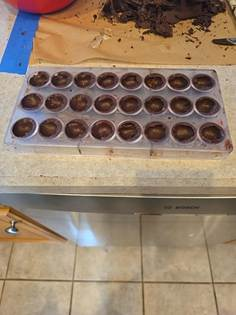
I guess there is still some room
Actually, yes. Looking at this photo, you did get hollow centers in most of them. They’re thicker than we intended, but this is absolutely salvageable. 🍫
There appears to be enough room for filling, especially if we don’t overfill. The shells may just have a more substantial chocolate bite this round.
Next step: leave the mold alone and let these shells crystallize completely. Don’t put filling in yet.
Once they’re firm, we’ll decide how much filling each cavity can comfortably take while still leaving enough room for the cap.
I’m not going to make the mango for this, I don’t think it’s worth it. Let’s do something with the apricot preserves
Yes. For this batch, apricot preserves make much more sense. No need to spend another hour building a fancy filling for shells we’re already treating as a learning batch. 😄
I’d keep it very simple: use the preserves as a soft fruit filling, but first we want to remove a little excess water so they don’t make the shells soggy or interfere with capping.
When the shells are nearly ready, we’ll take a small amount of your apricot preserves, gently heat it for a few minutes to thicken it slightly, then cool it completely before piping.
And because your shells are thick, we’ll fill them only to about 1/8 inch below the rim, leaving plenty of clean chocolate surface for the cap.
For now, though, leave the shells alone to finish setting. We’ll do the apricot next. 🍑🍫
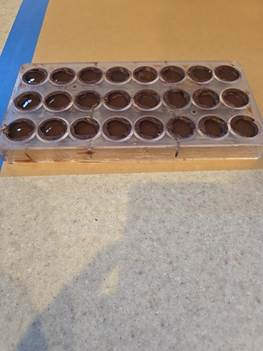
Okay, I filled the molds.
Yep, I can see them. The apricot is in, and you’ve left some headspace in the cavities, which is exactly what we need for the chocolate cap.
Now leave the mold alone for a bit. We want the apricot surface to settle and, most importantly, be completely cool before we cap it. Since you heated the preserves, I’d give it at least 15–20 minutes at room temperature.
Don’t cap yet. When we’re ready, we’ll recheck the remaining 811 and bring it back into its 87.8–89.6°F working range before closing these up. 🍑🍫
Perfect. 89°F is right in the 811 working range. Stop cooling.
Now do the same temper test as before: put a thin smear on a clean knife or spoon and leave it at room temperature.
Keep the bowl around 88–89°F while we wait. Don’t add any more seed.
Give the test 3 minutes, then tell me whether it’s dry and firm to the touch. 🍫
This one still seems shiny and wet after three minutes.
Okay, don’t use it for capping yet. Three minutes still shiny and wet means this batch hasn’t passed our temper test.
Since you still have that remaining seed, we can correct it without repeating the first batch’s thickness problem.
At about 89°F, add just a small amount of the remaining finely shaved seed, around 3–5 grams, and stir gently until it’s incorporated. We’re trying to introduce a little more stable crystal structure, not cool the whole bowl into pudding again.
Then keep the chocolate around 88–89°F and run another thin knife test.
So right now: 3–5 grams seed, stir thoroughly. Nothing more yet. 🍫
Okay, I added the seed, stirring. It’s about 86 degrees.
Okay. 86°F is a little below the 811 working range, so stop adding seed now.
Keep stirring until that seed is melted. Then very gently rewarm the chocolate to about 88.5–89°F. Use tiny bursts of heat because we only need a couple of degrees.
Once you’re back at 88.5–89°F, we’ll do another temper test before capping the apricot bonbons.
Damn, it went up to ninety-two.
You’re okay. 92°F isn’t catastrophic. Don’t add anything else and don’t heat it again.
Take it completely off the heat and stir gently but continuously. Let it come back down naturally to about 88.5–89°F.
Then we’ll run another temper test. We don’t need to start over yet. 🍫
Okay, doing another temper test.
Good. Leave that test completely alone for 3 minutes.
Meanwhile, give the bowl an occasional gentle stir and try to hold it around 88–89°F.
At three minutes, check whether the test has lost its wet shine and feels dry/firm to a very light touch. Tell me what you get. 🍫
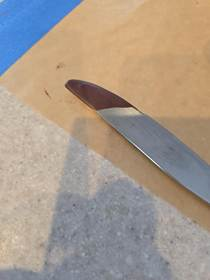
Looks okay, I guess.
Yes, that looks much better. The coating looks even and matte rather than wet and glassy, and I don’t see obvious streaking in the photo.
If it’s also dry and firm to a light touch after about three minutes, I’d call that a passing temper test.
Before we cap the apricot chocolates, check the bowl temperature one more time. What are you at?
86.7.
86.7°F is just below the 811 working range.
Since your temper test looks good, we don’t want to disturb those crystals. Give the bowl very gentle heat while stirring, just enough to bring it to about 88–89°F.
Go slowly. We’re talking 1–2 degrees, so tiny heat increments.
Stop at 88–89°F and tell me when you’re there. Then we cap. 🍫
Okay, 88.8.
Perfect. 88.8°F is right where we want the 811. Time to cap.
Next step only: pour/spread a layer of tempered chocolate across the entire top of the mold, making sure every cavity is completely covered and the chocolate contacts the exposed chocolate rim around each filling.
Then scrape firmly across the mold while the chocolate is still fluid to remove the excess and leave a flat, clean bottom.
Do that now, and show me what it looks like afterward. 🍫
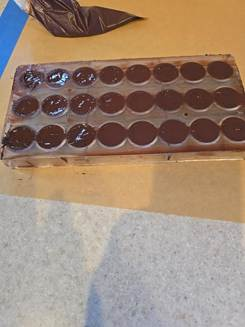
Okay, here we hope now.
Yep. Now we hope. 😄🍫
From the photo, all the cavities appear capped, and most have a good continuous chocolate seal. A few bottoms are a little rough, but that’s cosmetic. Don’t mess with them now.
At your 68°F room temperature, leave the mold flat, upright, and completely undisturbed for at least 30 minutes. Given how thick some of these shells are, I’d actually favor 45 minutes before we even think about unmolding.
No fridge. No poking. No “just checking one.” The chocolate gods have the wheel now.
I need some kind of bowl scraper to get the rest of the chocolate out of the bowl.
Yes. What you want is a flexible silicone bowl scraper, sometimes called a bowl scraper or bowl scraper spatula.
For chocolate, I’d get one that’s:
- One-piece silicone, so there are no seams trapping chocolate.
- Fairly thin and flexible at the edge, so it conforms to the curve of the bowl.
- About 4–6 inches wide, rather than a regular narrow spatula.
- Heat-resistant and dishwasher-safe.
That’ll let you sweep almost all that expensive Callebaut out instead of leaving a chocolate crime scene glued to the bowl. 😄🍫
The leftover chocolate hardened but feels still a little bit soft, so I don’t know if we were fully in temper or not.
That does not necessarily mean it was out of temper. At your 68°F room temperature, properly tempered dark chocolate should eventually become quite firm, but a thick mass of leftover chocolate in a bowl cools much more slowly than the thin knife test or the shells.
And remember, our final knife test did set dry and matte in about three minutes, which was a good sign.
So I wouldn’t diagnose the batch from the leftover bowl chocolate yet. Give that leftover chocolate more time. The real test will be the bonbons: clean release, glossy surface, firm snap, and no gray streaking/bloom.
For now, don’t disturb the mold. That’s going to tell us far more than the leftover chocolate will.
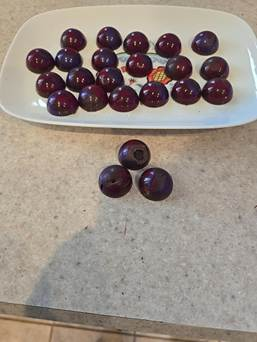
Okay, I waited. They didn’t all come out, but the ones that did look good, and I broke one and it tasted good, so I guess we’re okay.
Agreed. I would call this a success.
Absolutely. Success. Shiny shells, the cocoa-butter colors came through, the chocolates released well overall, and the apricot filling actually tastes good. That’s the scoreboard that matters. 🍫✨
And now we know exactly what to improve next time: less over-crystallization, more fluid chocolate, thinner shells. The second batch should already be noticeably easier.
Rainbow bonbons are no longer theoretical. 😄
About cleaning the molds. A lot of things say they don’t clean the molds, but I feel like with the leftover chocolate in them, I need to wash it.
Yes. In your situation, I would clean the mold. The “never wash your molds” advice is more nuanced than it sounds.
Chocolatiers often avoid washing polycarbonate molds between every batch when they’re already pristine. They may simply remove loose chocolate and polish the cavities, because repeated washing can leave mineral spots or detergent residue.
But you’ve got stuck chocolate, colored cocoa butter, and some apricot filling may have gotten where it shouldn’t. That’s a good reason to wash.
For this mold, I’d do this:
- Remove as much remaining chocolate as you reasonably can first.
- Wash with warm water and a small amount of mild, fragrance-free dish soap using something very soft. No abrasive sponge.
- Rinse extremely well.
- Dry it completely. Water droplets and mineral spots are the enemy of tomorrow’s shine.
- Once dry, polish each cavity gently with a very soft microfiber cloth or cotton pad.
Avoid very hot water, abrasive scrubbers, and the dishwasher. Polycarbonate scratches surprisingly easily, and every tiny scratch can eventually show up on your bonbons.
So yes, after today’s glorious purple-apricot battlefield, this mold has earned a bath. 😄
For now, I vote for eating one of the successful apricot bonbons while seated. That’s quality control, obviously. 🍫
Oh, I already cleaned up. It’s like it was never there.
Ha, immaculate crime-scene cleanup. 😄 Two colors of cocoa butter, dark chocolate, apricot preserves, tempering bowls, thermometers, and somehow the kitchen has no witnesses.